


What are Namespaces in K8s?
In Kubernetes, namespaces are a way to logically divide and isolate resources within a cluster. They provide a scope for naming and organizing objects, such as pods, services, replica sets, and other Kubernetes resources.
Namespaces are primarily used to create virtual clusters, allowing multiple teams or applications to coexist within the same physical cluster without interfering with each other.
They provide a level of isolation by ensuring that resources within a namespace have unique names within that namespace. This allows different teams or applications to use the same names for resources, such as "app", "service", or "config", without conflicts.
Default namespace in Kubernetes
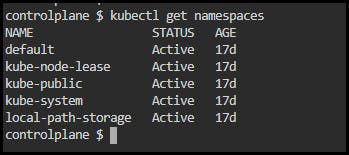
Kubernetes begins with four namespaces:
default: The namespace for objects that have no other namespace.
kube-system: The namespace for Kubernetes-created objects.
kube-public: This namespace is generated automatically and can be accessed by all users (including those not authenticated). This namespace is mostly reserved for cluster use, in case some resources need to be publicly visible and readable across the entire cluster. This namespace’s public aspect is merely a convention, not a requirement.
kube-node-lease: This namespace contains Lease objects for each node. Node leases enable the kubelet to send heartbeats to the control plane, allowing it to detect node failure.
Why we use namespaces in k8s?
Probably the most popular reason to use a namespace is that it provides the users a way to separate their applications into separate logical groups.
When you first get started working with Kubernetes, it’s tempting to have everything running in the same namespace.
Doing this is like running all of your applications on a single server, alongside each other can be very risky, because it opens you to the possibility that changes to one application will result in changes in another application. This is why you want isolation. Namespaces make it possible to completely separate the resources each application uses.
Here are some reasons why namespaces are used in Kubernetes:
Resource Isolation: Namespaces provide resource isolation within a Kubernetes cluster. By creating separate namespaces, you can logically separate and isolate resources, preventing conflicts and interference between different teams, projects, or applications. Each namespace has its own set of resources, such as pods, services, and volumes, which are independent of resources in other namespaces.
Multi-tenancy: Namespaces enable multi-tenancy in Kubernetes. They allow multiple teams or organizations to share a single Kubernetes cluster while maintaining separation and control over their resources.
Access Control and RBAC: Namespaces can be used to enforce access control and security policies. Kubernetes supports Role-Based Access Control (RBAC), and namespaces can be used as a boundary for defining roles and permissions. By assigning specific roles to users or groups within a namespace, you can control who can access and manage resources within that namespace.
Resource Quotas: Namespaces allow you to set resource quotas to limit the amount of compute resources (CPU, memory) and storage that can be consumed by resources within a namespace. Quotas help ensure fair resource allocation and prevent resource starvation or abuse by specific applications or teams.
Organizational Structure: Namespaces provide a way to organize and manage resources based on different organizational structures or environments. For example, you can create namespaces for different development stages (e.g., development, staging, production) or for different departments within an organization. This helps in maintaining a clear separation between different environments and simplifies resource management.
Namespace Scoping: Kubernetes provides the ability to scope network policies, services, and other resources to specific namespaces. This allows you to define network policies that control traffic between different namespaces, enabling fine-grained network segmentation and security.
Resource Naming: Namespaces provide a way to avoid naming conflicts between resources. Each resource within a namespace must have a unique name, but resources with the same name can exist in different namespaces. This allows you to reuse resource names across namespaces without conflicts.
Kubernetes Namespaces Command:
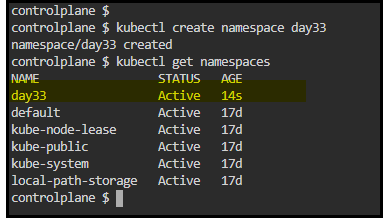
a) Create a Namespace:
kubectl create namespace <namespace-name>
b) Get Namespaces
kubectl get namespace
or
kubectl get ns
c) Switch Context to a namespaces
kubectl config set-context --current --namespace=<namespace-name>
d) Describe namespaces
kubectl describe ns <namespace-name>
e) Delete a namespace
kubectl delete namespace <namespace-name>
f) Apply resource configuration to a namespace
kubectl apply -f <resource-file.yaml
Task1:
Create a namespace. Verify it's created then create a deployment in the newly created namespace.
Step 1: Create a Namespace to create a Namespace for your Deployment, run the following command:
kubectl create namespace <namespace-name>
Step 2: Create deployment.yml Edit your deployment.yml file to include the Namespace you created.
 apiVersion: apps/v1
 kind: Deployment
 metadata:
   name: todo-app-deployment
   namespace: day33
 spec:
   replicas: 3
   selector:
     matchLabels:
       app: todo-app
   template:
     metadata:
       labels:
         app: todo-app
     spec:
       containers:
       - name: todo-app-deployment
         image: chandanahdam/todo-app
         ports:
         - containerPort: 8000
Step 3: Apply the updated Deployment and use the following command
kubectl apply -f deployment.yml -n <namespace-name>
Step 4: Verify Namespace to ensure that the Namespace has been created successfully, run the following command:
kubectl get namespaces
Step 5:
kubectl get pods -n <namespace-name>

What are services in K8S?
In Kubernetes, a Service is an abstraction that provides a stable network endpoint to access a set of pods. It acts as a load balancer and provides a reliable way to access and communicate with pods, regardless of their underlying IP addresses or their dynamic scaling.
With Service, it is very easy to manage load balancing configuration. It helps pods to scale very easily.
Here are some key features about Services in Kubernetes:
Pod Discovery and Load Balancing: Services enable client applications to discover and access pods running in a Kubernetes cluster. Rather than directly accessing individual pods, clients can connect to a Service, which distributes incoming traffic to the pods behind it. Services implement load balancing algorithms to evenly distribute traffic among the available pods.
Stable Network Endpoint: A Service has a stable virtual IP address (ClusterIP) that remains consistent even if the underlying pods are added, removed, or scaled horizontally. This allows clients to connect to the Service using a single, consistent endpoint, which simplifies application configuration and connectivity
Internal and External Connectivity: Services can be used for both internal and external connectivity. Internal Services are primarily used for communication between different components (e.g., microservices) within the cluster, while external Services expose applications to clients outside the cluster.
Service Discovery: Kubernetes provides DNS-based service discovery, where each Service is assigned a DNS name that can be used to resolve the Service's IP address. Applications can use the Service name to connect to the Service without needing to know the specific pod IP addresses.
Selectors: Services use label selectors to determine which pods should be included in their backend. By specifying a label selector, a Service can dynamically discover and include pods that match the specified labels.
Headless Services: In addition to load-balanced Services, Kubernetes also supports headless Services. A headless Service is used when direct access to individual pod IP addresses is required. Instead of load balancing, a headless Service returns the IP addresses of all the pods that match the label selector.
How to Create a service in k8s?
To create a Service in Kubernetes using a YAML manifest:
apiVersion: v1
kind: Service
metadata:
  name: my-service
spec:
  selector:
    app: my-app
  ports:
    - protocol: TCP
      port: 80
      targetPort: 8080
Let's break down the components of this example:
apiVersion: Specifies the Kubernetes API version being used. In this case, it'sv1.kind: Specifies the type of resource we want to create, which is aService.metadata: Contains metadata about the Service, such as its name.spec: Defines the specification of the Service.selector: Specifies the label selector used to determine which pods the Service should target. In this example, the Service will target pods with the labelapp: my-app.ports: Defines the ports that the Service will expose.protocol: Specifies the protocol for the port. Here, it's set toTCP.port: Specifies the port number on which the Service will be accessible.targetPort: Specifies the port number on the pods that the Service will forward traffic to.To create the Service in Kubernetes, you can save this YAML manifest to a file, for example,
service.yaml, and then use thekubectl applycommand:kubectl apply -f service.yaml
So we need something that is consistent so that things outside or inside the cluster might be able to access it persistently. A Service is a Kubernetes object that acts as an endpoint for enabling the communication between various components within and outside the application. In other words, a service is a stable address for pods. The three important Service types in Kubernetes are:
ClusterIP
NodePort
LoadBalancer
ExternalName Service
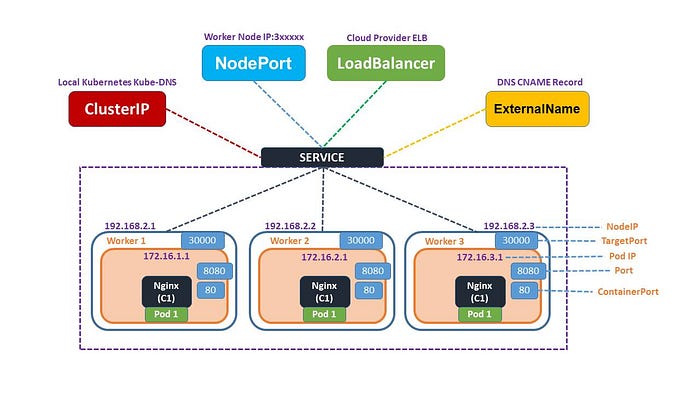
ClusterIP: This is the default type of Service. It exposes the Service on an internal IP address, accessible only within the cluster. It enables communication between different components (e.g., microservices) within the cluster. This type of Service is not accessible from outside the cluster.
Here is an example of a .yaml file describing a ClusterIP Service object:
apiVersion: v1 kind: Service metadata: name: nginx-clusterip spec: type: ClusterIP selector: run: app-nginx ports: - port: 80 protocol: TCPNodePort: A NodePort Service exposes the Service on a static port on each node's IP address. It allows external access to the Service by forwarding traffic to the associated pod. The Service is accessible externally using the combination of
<NodeIP>:<NodePort>. NodePort Services are often used during development or testing phases when an external load balancer is not available.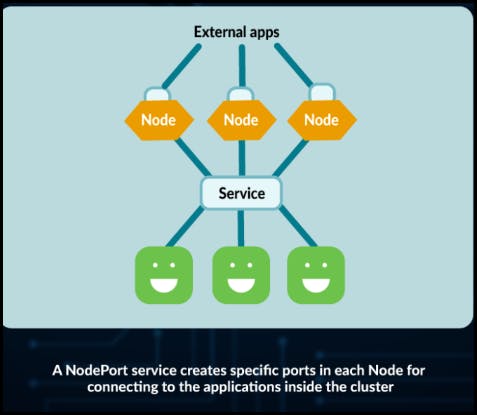
Below, we have an example of a .yaml file describing a NodePort Service object:
apiVersion: v1 kind: Service metadata: name: nginx-nodeport spec: type: NodePort selector: run: app-nginx ports: - nodePort: 30001 port: 80 targetPort: 80LoadBalancer: A LoadBalancer Service automatically provisions an external load balancer (e.g., in cloud environments) to expose the Service on a public IP address. It distributes incoming traffic to the Service across multiple nodes. LoadBalancer Services are typically used to make a Service accessible from outside the cluster. The external load balancer provides a single entry point to the Service.
Below, we have an example of a .yaml file describing a LoadBalancer Service:
 apiVersion: v1
 kind: Service
 metadata:
  name: nginx-load-balancer
 spec:
  type: LoadBalancer
  selector:
    run: app-nginx
  ports:
  - port: 80
    targetPort: 80
ExternalName Service:
An ExternalName Service in Kubernetes is useful when you have a service that is running outside your Kubernetes cluster, such as a database, and you want to access it from within your cluster.
An example of .yaml file defining an ExternalName Service:
    apiVersion: v1
    kind: Service
    metadata:
     name: db-prod
    spec:
     type: ExternalName
     externalName: db-prod.example.com
Networking:
Networking in Kubernetes is a crucial aspect that enables communication between various components, such as pods, services, and external resources. Kubernetes provides a networking model that allows these components to discover and communicate with each other effectively.
Pod-to-Pod Communication: Pods are the fundamental units of deployment in Kubernetes. Pods within the same node can communicate with each other directly using localhost. For pods running on different nodes, Kubernetes assigns each pod a unique IP address. This allows pods to communicate across nodes using their IP addresses.
Pod-to-Service Communication: Services provide a stable network endpoint for accessing a set of pods. When a Service is created, Kubernetes automatically assigns it a virtual IP address (ClusterIP). Pods can communicate with a Service using the Service's IP address and port. Kubernetes handles the load balancing and routing of traffic to the appropriate pods behind the Service.
Ingress: Ingress is an API object in Kubernetes that manages external access to Services within the cluster. It acts as a reverse proxy and exposes HTTP and HTTPS routes to external clients. Ingress controllers, such as Nginx or Traefik, are responsible for implementing the Ingress rules and routing traffic to the appropriate Services based on the incoming requests.
Network Policies: Network Policies in Kubernetes allow you to define rules for network traffic within the cluster. They provide a way to enforce security and segmentation by controlling which pods can communicate with each other based on labels, IP addresses, ports, and protocols. Network Policies are implemented by network plugins or solutions, such as Calico or Cilium.
Container Network Interfaces (CNI): Kubernetes relies on Container Network Interfaces (CNI) plugins to implement networking between containers and pods. CNIs are responsible for configuring network connectivity, assigning IP addresses, and managing network routes within the cluster. Examples of popular CNI plugins include Calico, Flannel, Weave, and Cilium.
Thank you for 📖reading my blog, 👍Like it and share it 🔄 with your friends.
Happy learning😊😊 !!!