

Table of contents
Persistent Volumes in K8S:
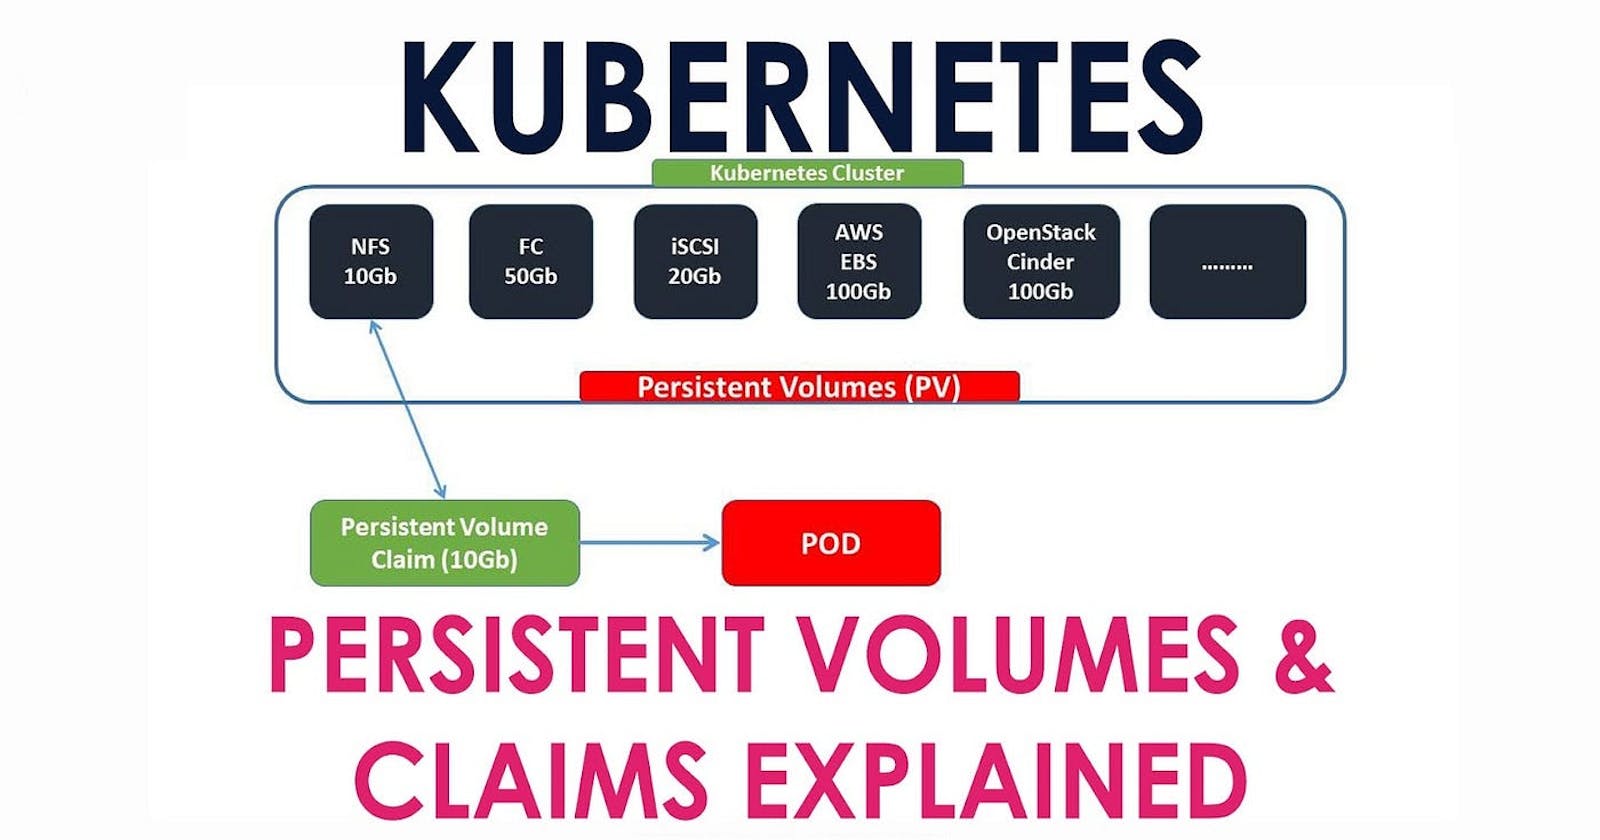
Persistent Volumes is the way to define the storage data, such as storage classes or storage implementations. Unlike ordinary volumes, PV is a resource object in a Kubernetes cluster; creating a PV is equivalent to creating a storage resource object. To use this resource, it must be requested through persistent volume claims (PVC).
A PVC volume is a request for storage, which is used to mount a PV into a Pod. The cluster administrator can map different classes to different service levels and different backend policies.
This allows developers to focus on defining their storage requirements, such as capacity and access modes, without worrying about the specific storage technology or infrastructure details.
There are two related concepts you should understand as you start working with Kubernetes persistent volumes:
PersistentVolumeClaim (PVC):
This is a request sent by a Kubernetes node for storage. The claim can include specific storage parameters required by the application—for example an amount of storage, or a specific type of access (read/write, read-only, etc.).
Kubernetes looks for a PV that meets the criteria defined in the user’s PVC, and if there is one, it matches claim to PV. This is called binding. You can also configure the cluster to dynamically provision a PV for a claim.
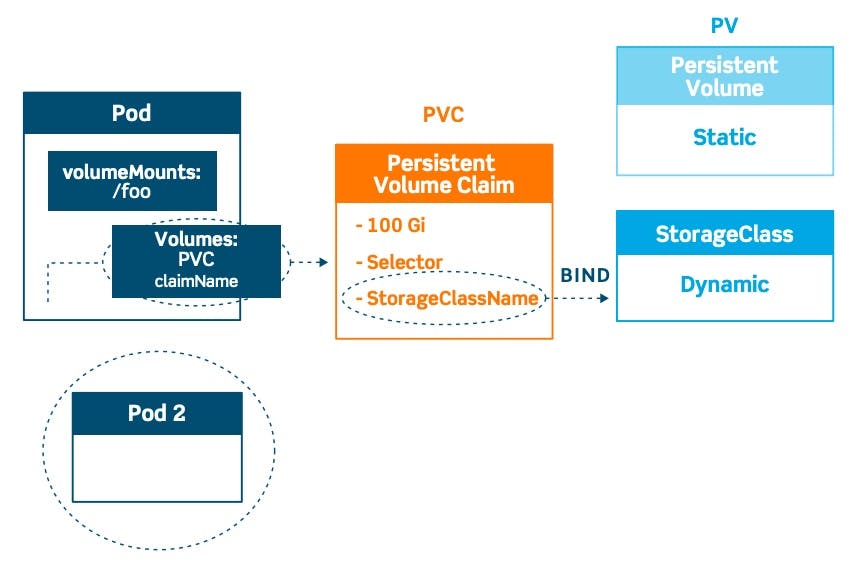
StorageClass:
The StorageClass object allows cluster administrators to define PVs with different properties, like performance, size or access parameters. It lets you expose persistent storage to users while abstracting the details of storage implementation. There are many predefined StorageClasses in Kubernetes (see the following section), or you can create your own.
Here is the example for persistent volume,
Persistent storage volume can be carried out through the YAML configuration file and specify which plugin type to use. The following is a YAML configuration file for persistent storage volume. This configuration file requires 5Gi of storage space to be provided. The storage mode is Filesystem, the access mode is ReadWriteOnce, and the persistent storage volume is recycled through the Recycle recycling policy. Finally, the storage class is specified as slow, and the NFS plug-in type is used.
apiVersion: v1
kind: PersistentVolume
metadata:
  name: pv0005
spec:
  capacity:
   storage: 5Gi
  volumeMode: Filesystem
  accessModes:
   - ReadWriteOnce
  persistentVolumeReclaimPolicy: Recycle
  storageClassName: slow
  mountOptions:
   - hard
   - nfsvers=4.1
  nfs:
   path: /tmp
   server: 172.17.0.2
Lifecycle of Persistent Volume:
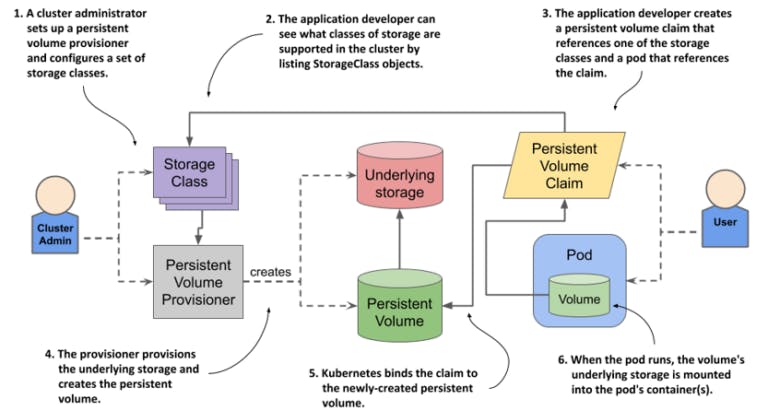
Lifecycle of a Persistent Volume (PV) in Kubernetes goes through several stages, from creation to deletion. Here is an overview of the typical lifecycle of a PV:
Provisioning: The PV is provisioned either statically by an administrator or dynamically by a Persistent Volume Provisioner. During provisioning, the PV is associated with a specific storage resource or volume provided by the underlying infrastructure.
Available: After provisioning, the PV enters the "Available" state. It means that the PV is ready to be claimed by a Persistent Volume Claim (PVC) and can be bound to a pod.
Binding: When a PVC is created and it matches the criteria of a PV (such as capacity, access mode, and storage class), the PV is bound to the PVC. This creates an association between the PV and the PVC, indicating that the PV is allocated for use by the PVC.
Bound: In the "Bound" state, the PV is successfully bound to a PVC and is considered in use. The PV is now associated with a specific pod or pods that use the PVC. The pod(s) can mount and use the storage provided by the PV.
Used by Pods: While the PV is in the "Bound" state, the associated pod(s) can read from and write to the storage provided by the PV. The PV continues to exist independently of the pod(s) and can be accessed by multiple pods if the access mode allows it.
Reclaiming: When a pod or application no longer requires the PV, the PV enters the "Released" state. At this point, the PV is no longer actively used, but the data stored on it is retained. The PV can be bound to a new PVC or remain unbound.
Deletion: The final stage of the PV lifecycle is deletion. This can happen in a few ways:
Manual Deletion: An administrator can manually delete the PV when it's no longer needed. This typically involves reclaiming or deleting the underlying storage resource.
Reclamation Policy: PVs have a reclamation policy that determines what happens to the data on the PV when it's released or deleted. The policy can be set to retain the data, delete it, or perform custom actions defined by the storage provider.
Automatic Deletion: If the PV is dynamically provisioned and the associated PVC is deleted, the PV may be automatically deleted depending on the cluster's configuration and the reclaim policy
When can you use PV's in K8S?
One common use case for Persistent Volumes is database management. Databases often require persistent storage to maintain data integrity and ensure high availability. By using a Persistent Volume, administrators can ensure that the data stored in the database remains persistent even if the corresponding pod goes offline or gets rescheduled.
Another use case for Persistent Volumes is file sharing and collaboration applications. Applications like content management systems or file servers often require shared storage where multiple pods can read and write data simultaneously.
Task 1:
Adding a Persistent Volume to Your Deployment (todo app)
Step 1: Create a Persistent Volume (PV)
apiVersion: v1
kind: PersistentVolume
metadata:
  name: pv-todo-app
spec:
  capacity:
    storage: 1Gi
  accessModes:
    - ReadWriteOnce
  persistentVolumeReclaimPolicy: Retain
  hostPath:
    path: "/temp/data"
Apply this PV configuration using the command:
kubectl apply -f pv.yml
# verify the setup
kubectl get pv -n <namespace>

Step 2: Create a Persistent Volume Claim (PVC)
Here's the PVC configuration (pvc.yaml):
apiVersion: v1
kind: PersistentVolumeClaim
metadata:
  name: pvc-todo-app
  namespace: todo
spec:
  accessModes:
    - ReadWriteOnce
  resources:
    requests:
      storage: 500Mi
Apply this PVC configuration using the command:
kubectl apply -f pvc.yaml
# verify the setup
kubectl get pvc -n <namespace>

Step 3: Update your Deployment to use the PVC
Here's the updated Deployment configuration:
apiVersion: apps/v1
kind: Deployment
metadata:
  name: todo-app-deployment
spec:
  replicas: 1
  selector:
    matchLabels:
      app: todo-app
  template:
    metadata:
      labels:
        app: todo-app
    spec:
      containers:
        - name: todo-app
          image: nginx
          ports:
            - containerPort: 8000
          volumeMounts:
            - name: todo-app-data
              mountPath: /tmp/data
      volumes:
        - name: todo-app-data
          persistentVolumeClaim:
            claimName: pvc-todo-app
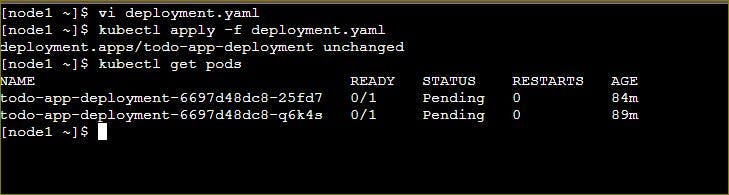
Apply the updated Deployment configuration using the command:
kubectl apply -f deployment.yaml
kubectl get pods -n <namespace>
Step 5: Verify the Setup
Check if everything is set up correctly. Run these commands to verify:
kubectl get pods -n <namespace>
kubectl get pv -n <namespace>
Task 2:
Accessing Persistent Volume Data Within a Kubernetes Pod and include the additional steps you provided:
Step 1: Connect to a Pod in your Deployment
You can access the pod by running the following command:
kubectl exec -it <pod-name> -- /bin/bash

Step 2: Inside the App Folder, Create a New File (some.txt)
Once you are inside the pod, navigate to the /tmp folder, and create a new file named some.txt. You can create the file using the following commands:
cd /tmp
touch hello.txt
This command creates an empty hello.txt file within the /tmp folder.
Step 3: Verify Access to Data Stored in the Persistent Volume
To verify that you can access the data stored in the Persistent Volume (PV) from within the pod, you can add some content to the hello.txt file. For example:
Step 4: Delete the Pod
Now, you can delete the pod you created earlier. When you delete it, Kubernetes automatically creates a new pod to replace it.
kubectl delete pod <pod-name>
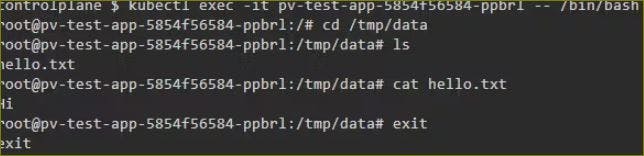
Step 5: Access the New Pod and Check for hello.txt
After the new pod is created, you can access it using the following command:
kubectl exec -it <new-pod-name> -- /bin/bash
These steps will confirm that the data you stored in the Persistent Volume is accessible even after deleting and recreating the pod.
Thank you for 📖reading my blog, 👍Like it and share it 🔄 with your friends.
Happy learning