

Table of contents
- 1.What is Kubernetes and why it is important?
- 2. What is difference between docker swarm and kubernetes?
- 3.How does Kubernetes handle network communication between containers?
- 4.How does Kubernetes handle scaling of applications?
- 5.What is a Kubernetes Deployment and how does it differ from a ReplicaSet?
- 6.Can you explain the concept of rolling updates in Kubernetes?
- 7.How does Kubernetes handle network security and access control?
- 10.How ingress helps in kubernetes?
- 11.Explain different types of services in kubernetes?
- 12.Can you explain the concept of self-healing in Kubernetes and give examples of how it works?
- 13.How does Kubernetes handle storage management for containers?
- 14.How does the NodePort service work?
- 15.What is a multinode cluster and single-node cluster in Kubernetes?
- 16.Difference between create and apply in kubernetes?
1.What is Kubernetes and why it is important?
Kubernetes is an open-source container orchestration platform originally developed by Google. It provides a framework for automating the deployment, scaling, and management of containerized applications. Containers are lightweight, standalone executable units that package application code and its dependencies, allowing for easy deployment and portability across different computing environments.
Some reasons why Kubernetes is important:
Container Orchestration: Kubernetes simplifies the management of containers at scale. Kubernetes then takes care of deploying and managing the containers, ensuring that the actual state matches the desired state.
Scalability: Kubernetes enables you to scale your applications easily. It can automatically scale the number of containers based on resource utilization or other defined metrics.
High Availability: Kubernetes provides mechanisms for ensuring high availability of applications. It supports automatic container restarts, replication, and distribution of containers across multiple nodes in a cluster.
Service Discovery and Load Balancing: Kubernetes includes built-in service discovery and load balancing capabilities. It assigns a unique DNS name to each container, allowing other services to discover and communicate with them easily. It also distributes network traffic across containers using load balancing, ensuring efficient utilization of resources.
Portability and Infrastructure Flexibility: Kubernetes abstracts the underlying infrastructure, allowing you to deploy and manage applications consistently across different environments, such as on-premises data centers, public clouds, or hybrid setups.
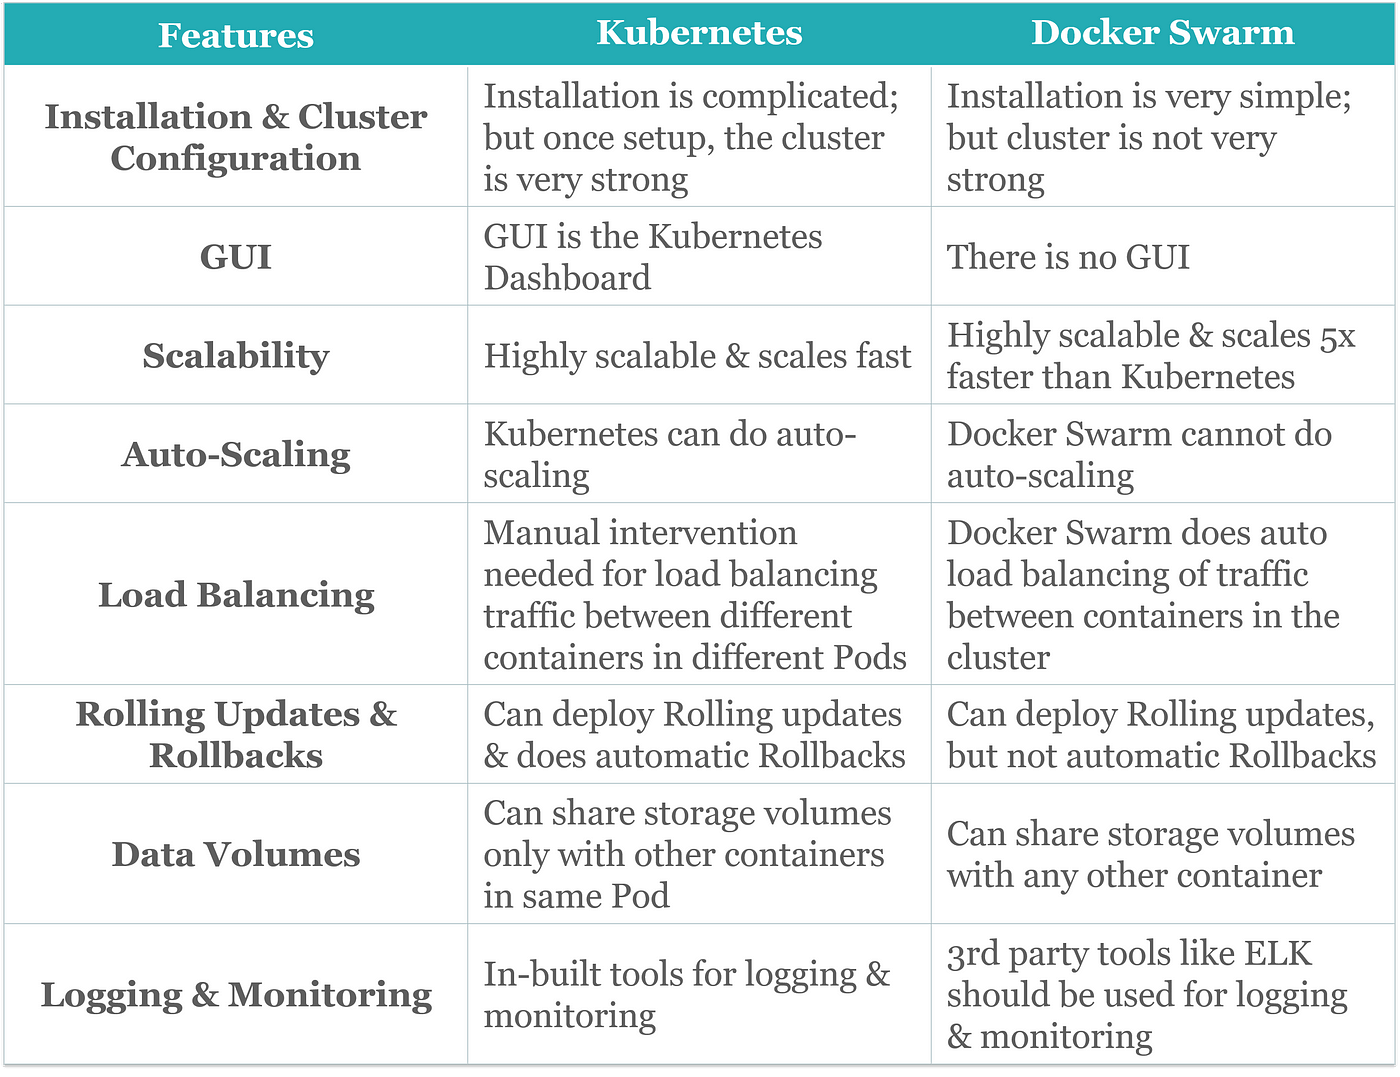
2. What is difference between docker swarm and kubernetes?
3.How does Kubernetes handle network communication between containers?
Kubernetes provides a networking model that allows containers to communicate with each other within a cluster. It abstracts the networking details and provides a consistent and flexible approach to handle network communication between containers.
Here's an overview of how Kubernetes handles network communication between containers:
Pods: In Kubernetes, containers are grouped into units called "pods." A pod is the smallest deployable unit in Kubernetes and represents one or more containers that are tightly coupled and share the same network namespace.
Pod IP Address: Each pod in Kubernetes is assigned a unique IP address, known as the "Pod IP." Containers within the same pod can communicate with each other using this IP address. The Pod IP is typically an internal IP within the cluster and is not accessible from outside the cluster.
Service: Kubernetes introduces a higher-level abstraction called a "Service" to provide stable network endpoints for pods. It acts as a load balancer and provides a single, stable IP address and DNS name for a group of pods.
Cluster Networking: Kubernetes relies on a networking implementation to handle the communication between pods and services within the cluster. There are various networking solutions available, such as Kubernetes CNI (Container Network Interface) plugins, which provide networking capabilities like IP address management, routing, and network policies.
Network Policies: Kubernetes supports Network Policies, which are a set of rules that control the traffic flow between pods and services. Network Policies allow you to define fine-grained access controls based on IP
addresses, ports, and other criteria.
4.How does Kubernetes handle scaling of applications?
Kubernetes provides built-in mechanisms for scaling applications based on resource utilization or other defined metrics. It simplifies the process of scaling applications both vertically (scaling up or down the resources of individual containers) and horizontally (scaling the number of container replicas).
Here's how Kubernetes handles scaling of applications:
Horizontal Pod Autoscaling (HPA): Horizontal Pod Autoscaling is a Kubernetes feature that automatically adjusts the number of replica pods in a deployment or a replica set based on the observed CPU utilization, memory usage, or custom metrics. With HPA, you can define target thresholds for these metrics, and Kubernetes will dynamically scale the number of replicas up or down to maintain the desired resource utilization.
Cluster Autoscaling: Cluster Autoscaling is a feature that scales the underlying cluster nodes based on resource demands. It ensures that the cluster has enough capacity to accommodate increased workload and automatically adds or removes nodes as needed.
Vertical Pod Autoscaling (VPA): Vertical Pod Autoscaling adjusts the resource allocation (CPU and memory) of individual containers based on their observed resource usage. It helps ensure that containers have adequate resources to handle their workload effectively.
Custom Metrics and Scaling: Kubernetes allows you to define custom metrics based on application-specific requirements. You can use custom metrics to scale your application horizontally or vertically.
For example, you can define a custom metric based on the number of requests per second and use it to trigger scaling actions. Kubernetes integrates with metrics platforms like Prometheus or Heapster to collect and monitor custom metrics.
Manual Scaling: Kubernetes also supports manual scaling, where you can manually set the desired number of replicas for a deployment or a replica set. Manually scaling allows you to fine-tune the application's capacity based on specific requirements or anticipated workload.
5.What is a Kubernetes Deployment and how does it differ from a ReplicaSet?
In Kubernetes, a Deployment and a ReplicaSet are both resources used to manage the lifecycle and scaling of application pods, but they serve different purposes and have distinct features.
Kubernetes Deployment:
A Deployment is a higher-level resource in Kubernetes that provides declarative updates and management for a set of replica pods. It defines the desired state of the application and handles the process of creating, updating, and scaling the pods to match that desired state and are commonly used for stateless applications.Key features of a Deployment include:
Declarative Updates: Deployments use a declarative approach, where you define the desired state of the application in a manifest file (YAML or JSON).
Kubernetes then ensures that the actual state matches the desired state, automatically handling updates and rollbacks if necessary.
Rolling Updates: Deployments support rolling updates, which means that when you make changes to the Deployment's configuration (e.g., updating the image version), Kubernetes orchestrates a smooth transition by gradually replacing the existing pods with the updated ones, ensuring minimal downtime.
Scaling: Deployments allow you to scale the number of replica pods up or down easily. You can specify the desired number of replicas, and Kubernetes manages the creation or deletion of pods accordingly.
Self-Healing: Deployments enable self-healing capabilities. If a pod fails or becomes unresponsive, Kubernetes automatically restarts or replaces it to maintain the desired state.
Revision History: Deployments track revision history, allowing you to roll back to a previous known-good state if needed.
Kubernetes ReplicaSet:
A ReplicaSet is a lower-level resource that ensures a defined number of replica pods are running at all times. It is the predecessor of Deployments and was introduced in earlier versions of Kubernetes. ReplicaSets are generally used when you need more direct control over scaling and updates or when you want to manage stateful applications.
Key features of a ReplicaSet include:
Pod Replication: A ReplicaSet maintains a specified number of replica pods based on the desired replica count you define. It ensures that the correct number of pods are running and replaces any pods that fail or are terminated.
Scaling: You can scale the number of replicas in a ReplicaSet manually, but it doesn't support automatic scaling like Deployments.
Selector-Based Matching: ReplicaSets use label selectors to identify the pods they manage. They select and manage pods based on matching labels, allowing you to target specific sets of pods.
6.Can you explain the concept of rolling updates in Kubernetes?
In Kubernetes, rolling updates are a strategy for updating or modifying a running application without causing downtime or disrupting the availability of the application. It is a controlled process that gradually replaces the existing instances of an application with the updated ones, ensuring a smooth transition and mitigating the impact on users.
Here's how rolling updates work in Kubernetes:
Deployment Configuration Update: To initiate a rolling update, you modify the configuration of a Kubernetes Deployment object. This can include changes like updating the container image version, modifying environment variables, or adjusting resource limits.
Pod Replacement: Kubernetes starts by creating new pods with the updated configuration. The new pods are created alongside the existing pods, allowing both versions to run simultaneously during the update process.
Scaling Up New Pods: As the new pods are created, Kubernetes gradually scales up the number of replicas for the updated version. This ensures that the application can handle the increasing workload as more instances of the updated version become available.
Load Balancing: Kubernetes uses a load balancer (typically implemented by a Service) to distribute network traffic across both the old and new pods. This ensures that user requests are still serviced by the application during the update process.
Monitoring: Kubernetes monitors the health and readiness of the new pods before considering them ready to receive traffic. It performs health checks to ensure that the new pods are responsive and functioning correctly.
7.How does Kubernetes handle network security and access control?
Kubernetes provides several mechanisms to handle network security and access control, allowing you to secure communication between components within the cluster and control access to resources. Here are some key features and concepts related to network security and access control in Kubernetes:
Pod-to-Pod Communication: By default, Kubernetes provides network isolation between pods by assigning each pod its own IP address and network namespace. Pods can communicate with each other directly using their IP addresses. However, this default network isolation does not enforce any authentication or encryption between pods.
Network Policies: Kubernetes supports Network Policies, which are a set of rules that control traffic flow between pods. Network Policies allow you to define fine-grained access controls based on source and destination IP addresses, ports, and other criteria. With Network Policies, you can enforce policies that restrict or allow communication between specific pods or namespaces, providing isolation and security within the cluster.
Service-to-Service Communication: Services in Kubernetes provide stable network endpoints for accessing pods. By default, services are accessible within the cluster. However, you can control access to services by configuring the Service's type and specifying appropriate access controls.
ServiceTypes: Kubernetes supports different types of services, including ClusterIP, NodePort, LoadBalancer, and ExternalName. Each type has different implications for network security and access control. For example, ClusterIP services are only accessible within the cluster, while LoadBalancer services may expose services to the external network.
Ingress: Kubernetes Ingress is an API object that manages external access to services within the cluster. It acts as an entry point and allows you to define rules for routing and forwarding traffic to specific services based on criteria such as hostnames, paths, or headers. Ingress can be configured with TLS termination to secure incoming traffic using SSL/TLS certificates.
Secrets: Kubernetes Secrets provide a secure way to store sensitive information, such as passwords, API keys, or certificates. Secrets are encrypted at rest and can be used to securely provide credentials or other confidential information to pods.
Authentication and Authorization: Kubernetes integrates with various authentication mechanisms, such as client certificates, bearer tokens, or static usernames/passwords, to authenticate and authorize users or processes accessing the cluster.
Kubernetes supports Role-Based Access Control (RBAC), which allows you to define fine-grained access policies based on roles and permissions. RBAC enables you to control who can perform specific actions within the cluster, enhancing security and access control.
Pod Security Policies: Kubernetes Pod Security Policies allow you to enforce security-related constraints on pods ,as restricting the use of privileged containers or enforcing specific security context settings. These policies help ensure that pods are created with the desired security configurations.
Container Image Security: Kubernetes does not directly handle container image security, but it integrates with container image scanning tools and registries that provide security features. These tools can analyze container images for known vulnerabilities, malware, or compliance issues, helping you ensure that your container images are secure before deploying them in Kubernetes.
8.Can you give an example of how Kubernetes can be used to deploy a highly available application?
Certainly! Here's an example of how Kubernetes can be used to deploy a highly available web application:
Scenario: You have a web application that serves user requests, and you want to ensure it remains highly available even if one or more components fail.
Steps to Deploy a Highly Available Application with Kubernetes:
Dockerize Your Application:
- Containerize your web application using Docker. Create a Docker image that includes your application code, dependencies, and runtime environment.
Create a Kubernetes Cluster:
- Set up a Kubernetes cluster with multiple nodes (VMs or physical machines) across different availability zones or regions. This ensures redundancy and fault tolerance.
Define Kubernetes Deployment:
- Create a Kubernetes Deployment resource to manage the application's Pods. Specify the desired replica count, container image, and resource requirements.
Use Horizontal Pod Autoscaling (HPA):
- Set up Horizontal Pod Autoscaling (HPA) to automatically adjust the number of Pods based on CPU or custom metrics. This scales the application horizontally to handle varying traffic loads.
Implement Service Discovery:
- Create a Kubernetes Service resource to expose your application internally. Use a LoadBalancer Service or Ingress to manage external access. This allows clients to access your application through a stable endpoint.
Configure Health Checks:
- Define readiness and liveness probes in your Pods' configuration. Kubernetes will continuously check the health of Pods. Unhealthy Pods are automatically replaced.
Implement Stateful Data Stores:
- If your application relies on databases or other stateful components, use Kubernetes StatefulSets to deploy and manage them. Ensure data persistence and replication for high availability.
Set Up Persistent Volumes:
- Use Kubernetes Persistent Volumes (PVs) and Persistent Volume Claims (PVCs) to provide reliable and shared storage for your application's data.
Implement Load Balancing:
- If your application has multiple instances, use Kubernetes Services to load balance traffic across them. This distributes requests evenly and ensures redundancy.
Monitor and Logging:
- Implement monitoring and logging solutions like Prometheus and Grafana to gain insights into your application's performance and health. Set up alerts for critical events.
Backup and Disaster Recovery:
- Implement regular backups of your application data and configuration. Create disaster recovery plans to quickly recover from unexpected failures.
Regular Updates and Testing:
- Continuously update your application and Kubernetes resources. Test updates in a staging environment before deploying to production to avoid potential issues.
9.What is a namespace in Kubernetes? Which namespace does any pod take if we don't specify any namespace?
In Kubernetes, a namespace is a logical and virtual cluster that allows you to partition and isolate resources within a single physical cluster. Namespaces provide a way to organize and manage objects, such as Pods, Services, and ConfigMaps, by grouping them into separate namespaces. This segregation helps avoid naming conflicts and provides a level of resource isolation.
If you don't specify a namespace when creating a resource (such as a Pod or Service), Kubernetes will place it in the default namespace. The default namespace is the one created when you set up a Kubernetes cluster, and any resources not explicitly assigned to a different namespace will be part of this default namespace.
10.How ingress helps in kubernetes?
In Kubernetes, Ingress is a resource and a controller that helps manage external access to services within the cluster. It acts as an API gateway and traffic manager, providing several benefits:
HTTP and HTTPS Routing: Ingress allows you to define rules for routing HTTP and HTTPS traffic to different services based on hostnames, paths, or other request attributes. This enables you to configure virtual hosts and route traffic to specific backend services.
Load Balancing: Ingress controllers often come with built-in load balancing capabilities. They distribute incoming traffic evenly among the Pods of the backend services, improving application availability and performance.
SSL/TLS Termination: Ingress controllers can handle SSL/TLS termination, decrypting encrypted traffic at the Ingress and forwarding it to backend services in plain HTTP. This simplifies certificate management and offloads the encryption/decryption workload from application Pods.
Path-Based Routing: You can define Ingress rules based on URL paths. This allows you to route requests to different services based on the URL path, enabling features like microservices-based routing and versioning.
Rewriting and Redirection: Ingress controllers often support URL rewriting and redirection rules. You can rewrite or redirect incoming requests to different paths or services, making it easier to manage application behavior.
Authentication and Authorization: Some Ingress controllers offer features for handling authentication and authorization, allowing you to secure access to your services. You can implement authentication methods like JWT validation or integrate with identity providers.
Web Application Firewall (WAF): Ingress controllers can be used in conjunction with WAF solutions to protect your applications from common web security threats, such as SQL injection and cross-site scripting (XSS) attacks.
Custom Error Pages: Ingress controllers allow you to configure custom error pages for specific HTTP error codes, providing a better user experience in case of errors.
Resource Management: Ingress resources are Kubernetes objects, making it easy to define, version, and manage routing rules alongside other application configurations.
11.Explain different types of services in kubernetes?
Certainly! In Kubernetes, there are several types of services, each serving a specific purpose:
ClusterIP: A ClusterIP service exposes a set of Pods within the cluster and makes them accessible by other Pods using an internal IP address. It's suitable for internal communication between Pods.
NodePort: A NodePort service exposes a set of Pods on a specific port on each node in the cluster. This allows external access to the service by accessing any node's IP address on the specified port. It's often used for development and testing purposes.
LoadBalancer: A LoadBalancer service exposes a set of Pods and provisions an external load balancer (e.g., cloud provider's load balancer) to distribute traffic to the Pods. It's ideal for exposing services to the internet with load balancing.
ExternalName: An ExternalName service provides DNS-level redirection to an external service outside the cluster by returning a CNAME record. It's used to make external services appear as if they are part of the cluster.
Headless: A Headless service doesn't assign a ClusterIP and is used for stateful applications. It allows DNS-based discovery of individual Pods and is often used with StatefulSets.
12.Can you explain the concept of self-healing in Kubernetes and give examples of how it works?
In Kubernetes, self-healing refers to the automatic detection and recovery from failures or issues within the cluster. Kubernetes continuously monitors the health and status of its components, such as nodes, pods, and containers, and takes proactive measures to restore them to the desired state. The self-healing capabilities of Kubernetes help ensure the availability and reliability of applications running in the cluster.
Here are some examples of how self-healing works in Kubernetes:
Pod Restarts: If a pod becomes unresponsive or crashes, Kubernetes automatically restarts the pod to restore it to a healthy state. The restart is typically triggered by health checks performed by Kubernetes, which monitor the readiness and liveness of the pods. For example, if a pod fails a readiness probe, Kubernetes considers it unhealthy and restarts it.
Node Failure Handling: In the event of a node failure, where a node becomes unreachable or fails, Kubernetes automatically detects the failure and reschedules the affected pods onto other available and healthy nodes. It redistributes the workload to maintain the desired replica count and ensures that the application remains available despite the node failure.
Replica Creation: If the number of replicas for a deployment or a replica set falls below the desired count, Kubernetes automatically creates new replicas to restore the desired state. This is particularly useful when pods fail due to issues like resource constraints or node failures.
Horizontal Pod Autoscaling (HPA): Kubernetes supports Horizontal Pod Autoscaling. If the resource utilization exceeds certain thresholds defined in the HPA configuration, Kubernetes will automatically scale up the number of replicas to handle the increased load. Similarly, if the resource utilization decreases, Kubernetes will scale down the replicas to optimize resource usage.
Rolling Updates: During a rolling update process, Kubernetes ensures the availability of the application by gradually replacing old pods with new ones. It monitors the health and readiness of the new pods before terminating the old ones. If any issues arise during the update, Kubernetes can automatically pause or roll back the update, reverting to the previous known-good state.
Pod Eviction: Kubernetes can evict pods that are consuming excessive resources or violating policies. For example, if a pod exceeds its defined resource limits or violates certain security policies, Kubernetes can automatically terminate the pod and reschedule it on a different node.
13.How does Kubernetes handle storage management for containers?
Kubernetes provides several mechanisms for managing storage for containers:
Volumes: Kubernetes allows you to attach Volumes to Pods, which are directories that exist within a Pod's file system. Volumes can be backed by various storage providers, including local disks, network-attached storage (NAS), cloud storage, and more. Containers within the same Pod can share data using Volumes. Volumes also persist data across container restarts and rescheduling.
Persistent Volumes (PVs) and Persistent Volume Claims (PVCs): PVs and PVCs are abstractions for managing storage resources within a cluster. PVs represent physical storage resources, while PVCs are requests for storage by Pods. PVCs are bound to PVs, providing a way to allocate and consume storage dynamically. Kubernetes supports various storage plugins, including cloud-based storage solutions and on-premises storage systems.
StatefulSets: StatefulSets are used for stateful applications that require stable network identities and stable storage. Each Pod in a StatefulSet has a unique network identifier and can be associated with its own Persistent Volume. This makes it suitable for databases, message queues, and other stateful workloads.
Dynamic Provisioning: Kubernetes supports dynamic provisioning of storage resources through StorageClasses. StorageClasses define different classes of storage with specific features and capabilities. When a PVC requests storage, it can reference a StorageClass, and Kubernetes will dynamically provision the appropriate PV based on the class definition.
Volume Snapshots: Kubernetes introduced the VolumeSnapshot resource, which allows you to capture a point-in-time copy of a Volume's data. This is useful for backup and disaster recovery scenarios.
CSI (Container Storage Interface): Kubernetes uses the CSI specification to enable third-party storage providers to develop their own storage plugins. CSI allows for greater flexibility and interoperability with various storage solutions.
Local Storage: Kubernetes also supports local storage devices. You can use Local Persistent Volumes to allocate local storage to Pods, useful for applications that benefit from low-latency access to local disks.
Object Storage: Kubernetes can interact with object storage systems like Amazon S3 or Google Cloud Storage using appropriate plugins and tools, allowing you to store and retrieve data from object stores.
14.How does the NodePort service work?
In Kubernetes, a NodePort service is a way to expose a service externally by allocating a static port on each node in the cluster. It allows external access to the service by forwarding traffic from a specific port on the node to a target port of the service running inside the cluster.
Here's how the NodePort service works:
Service Definition: To create a NodePort service, you define a Service object in Kubernetes configuration. In the service definition, you specify the type as "NodePort" and define the target port that the service is listening on.
Port Allocation: When you create the NodePort service, Kubernetes automatically assigns a port from a predefined range (typically 30000-32767) to the service. This port is the NodePort, and it remains static across all nodes in the cluster.
NodePort Mapping: Kubernetes maps the allocated NodePort on each node to the target port of the service. For example, if the NodePort is 32000 and the target port is 80, Kubernetes will forward traffic from port 32000 on each node to port 80 of the service.
External Access: To access the service from outside the cluster, you can use any node's IP address along with the allocated NodePort. For example, if a node's IP address is 10.0.0.1 and the NodePort is 32000, you can access the service using the URL
http://10.0.0.1:32000.Load Balancing: If there are multiple nodes in the cluster, the NodePort service provides a basic form of load balancing. When an external request arrives at a node's IP address and the allocated NodePort, Kubernetes forwards the traffic to one of the pods associated with the service. The specific pod is determined by the internal Kubernetes Service mechanism, which uses labels and selectors to route the traffic to the appropriate endpoints.
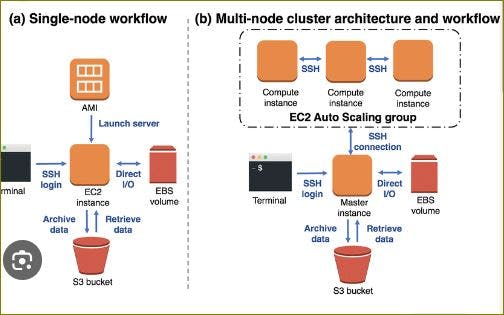
15.What is a multinode cluster and single-node cluster in Kubernetes?
Multinode Cluster: A multinode cluster, often referred to as a multi-node cluster, is a Kubernetes cluster that consists of multiple worker nodes, where each node is a separate machine or virtual machine (VM). These nodes collaborate to run containerized applications and manage workloads. Multinode clusters are commonly used in production environments to distribute workloads, provide high availability, and scale applications horizontally.
Single-Node Cluster: A single-node cluster, also known as a single-node Kubernetes cluster or "minikube" cluster, is a Kubernetes environment set up on a single machine or VM. It emulates the basic functionality of a Kubernetes cluster, including the control plane components (like the API server, scheduler, and controller manager) and a single worker node. Single-node clusters are often used for development, testing, and learning purposes. They are useful for local development and experimentation but lack the high availability and scaling benefits of multinode clusters.
16.Difference between create and apply in kubernetes?
kubectl create:
The
kubectl createcommand is used to create a new resource in the cluster from a YAML or JSON file. If the resource already exists with the same name, it will result in an error. It does not update existing resources; it only creates new ones.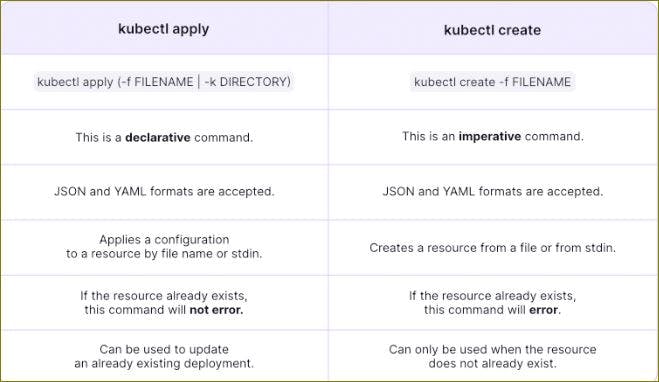
kubectl apply:
- The
kubectl applycommand is used to create, update, or partially modify resources in the cluster based on the contents of a YAML or JSON file. If the resource does not exist, it will be created. If it already exists,applywill update the resource according to the changes made in the file.applyis declarative and attempts to maintain the desired state of the resources.
Thank you for 📖reading my blog, 👍Like it and share it 🔄 with your friends.
Happy learning😊😊